12.12.2013

How to Drill Holes into Rocks (And Glass)

I've been asked, 'how do you drill holes into the sea glass thing you posted?'. Here's a tutorial that will help you with that. But it's for rocks. Hey, don't fret. It'll work for glass too. So, without further ado, I give you:


You'll need these materials:
  • Plastic Tupperware thingamajig you don't care about
  • Stones (or glass, like sea glass)
  • Pliers (or, if you're brave, your hands)
  • Dremel (or similar) tool
  • Diamond tip
  • 1-2 cups Water


So first take your dremel tool (or similar [I'll just call it a drill for now]), and get a diamond head. Diamond heads usually look like this:


Put that on the drill. Now pour your water into the Tupperware thingamajig. Put a small rock into the container. Add water until the water level comes up just above it. Switcho on your drill and, trying to keep it level, start to drill into the stone under the water. Try to keep it straight! If you have a drill press, it's best to use that.
In this image, I'm not holding it. For camera purposes. But really, hold it with your pliers/hand. Please That's a better idea.


CAREFUL THOUGH!
Every few seconds or so, ease up on the drill. Pull it up off the stone or completely out of the hole you are creating. Let the water into the hold you're drilling to cool the stone off so the stone doesn't crack or destroy the diamond tip on you.
This whole process can be repeated the exact same way with a piece of sea glass (or glass, if you prefer that) instead of a stone.


And you're done! Now you've got a wonderful stone with a hole in it, perfect for finding hidden treasures. So now make with it what you will! Enjoy!

12.08.2013

How To Make An Octopus Tentacle Pendant

Hello. It's been what, three, four months since this blog has been updated? My, how time flies.
I'm here once more to give you another tutorial. On a jewellery type item. This time, we're looking at,


Yes, yes, you all want one. Let me tell you how you can make one. Let us go on a word-and-picture journey, shall we?

Step 1!  ASSEMBLE! Your materials.

You will probably need:
Tinfoil
1 length of Chain (fit to the size you want/need)
Unwanted Polymer Clay
Oven
Embroidery Needle or Pencil
Jump Ring(s)
Polymer Clay, Any Two Colours.

First, take the polymer clay you don't want/need, constitute it, and roll it across your work surface and your hands, cleaning them off. This ensures that when you form the tentacle(s) they don't get stuff on them from dust or animal fur or anything.


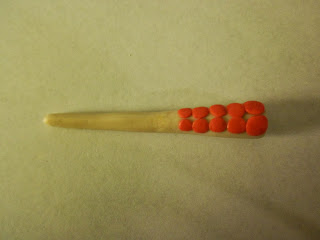
Now lets get down with your first colour of polymer clay. Roll it out onto your work surface, making a little cone shape. However long you want to make it is fine, but I opt for 6 to 7 cm (2 1/2 inches, about)


Next, take your second colour of polymer clay and roll out a long, thin strand. Cut the strand into small sections, about 2mm long.
Step 3

Next, take each section and roll into spheres. Slightly flatten spheres until they're about the width of a penny, maybe a bit less.


Start placing dots onto the cone until it is filled all the way.


Start placing the dots on the cone.
I like two rows on my tentacle, but you can obviously do more or less depending on how shaky your hands are, or how pleasing it is to your eye. All up to you!
As you go down the cone, the dots can get bigger than you want them to. Just carefully take the dot off, shave a bit of the clay off, re-roll into a ball, and flatten. That might do the trick. If it doesn't, repeat.
Fill the cone all the way to the end.
Poke holes into each dot with pencil or embroidery needle.

Step 6

Shape it! Twist it around something, free form it, whatever! Work it, gurl!

Step 7

Now poke a hole in the top of the cone (the big end). If you decide not do do this step and drill a hole in the top later, that's totally fine. (I have a wire loop in there because the hole kept on collapsing, and it needed support)

Anywho, once you're done with that, put it into an oven-safe something, throw that into the oven (Please, not literally) and bake according to the manufacture's instructions (I've always wanted to say that). You can support your piece with the tinfoil, if you'd like.

WOOT! Look at what you've got now, a tentacle! SHWEET! Nice job, guys! If you chose not to poke a hole in the top before baking, you can drill the polymer clay once it's cool. If you did add a hole, put in a jump ring and let your chain through it. If you want, you can sand the tentacle with a very fine grit. Or finish it with a craft gloss. Just do with it what you please!

8.30.2013

How to Make Faux Sea Glass

It has been popping up more and more these days. Creations made from driftwood, shells, and sea (or beach) glass. Beautiful things, like mobiles, sculptures, lamps, and more. But some people just don't have the time (or even energy) to look for the elusive sea/beach glass, and because of its rarity, those who do look for it find it in less amount than they hope for. Never fear, citizen, for it is I, the blogger, who shall tell you,

How to make Faux Sea/Beach Glass


It's incredibly simple, but a word of caution.
This is fake sea glass. Keyword: FAKE. The glass will not have the same texture of real sea glass, which is more battered and pitted than this version. Nevertheless, if you still call it faux, or fake sea glass, it tends to be much less misleading. Whenever using it in projects, word it the same way (i.e. fake sea glass pendant, faux beach glass medallion, e.t.c) in order to avoid accusations against you if you might be using it in items that are for sale.

It's easy, easier than you might think. And kind of fun preparing it, too. But in order to create this work of magic, you'll need these things.

Things you'll need

  • A rock tumbler
  • Unwanted glass (mason jars, beer bottles, e.t.c.)
  • Safety goggles (safety first!)
  • A hammer
  • Two paper bags
  • A handful or two of sand- The coarser, the better!

The garden trowel pictured is optional should you prefer it to digging the sand with your hands.

All right! Let's get started! There are two relatively easy steps to this.

STEP 1: Crushing the Glass

Put on those safety goggles and look fabulous! Next, take your paper bags and put one inside of the other, like so.


Add your various glass bottles...


And crush it with an iron fist into smallish pieces! (You can use your hammer, too.)


(psst! If you decide to hold the bag, use protective gloves! Just in case)

Step 2: THE TUMBLING

Take your freshly shattered glass and fill your rock tumbler container 2/3 of the way full. Either pour it into the tumbler, or pick it up and put it in (wearing gloves, please)

(That face on the bag watches you- it approves of your DIY)
Next, add a handful or so of sand, and fill the container with just enough water so that a thin layer covers the top of the glass. Now screw on the lid (TIGHTLY) and put it into the rock tumbler.
Remember to put your rock tumbler into the garage or an unused room, somewhere where it won't be a disturbance to anyone.


Set to tumble for four days. Once four days of constant wondering-when-your-glass-is-done-tumbling is over, retrieve the container and open it. Carefully. Inside will be.....


A brown foam.
Have no fear! You have many options, one being dumping the lot into a sieve and rinsing it out outside, or dumping it onto a driveway and washing the sand off the glass pieces.
A WORD OF CAUTION:  Do NOT rinse out your tumbler container in the sink. The sand will likely clog up the drainage system. Do it outside, on the pavement or in grass.

Lay the glass on absorbent paper (paper towel) or absorbent cloth so that they may dry. Clean out the container, and the tumbler, if it was dirtied, and either repeat the process or enjoy your newly-created faux sea glass!


Thanks for reading!

UPDATE: A short tutorial will be coming soon on how to drill holes in the glass! Stay tuned.