I'm here once more to give you another tutorial. On a jewellery type item. This time, we're looking at,

Yes, yes, you all want one. Let me tell you how you can make one. Let us go on a word-and-picture journey, shall we?
Step 1! ASSEMBLE! Your materials.
You will probably need:
Tinfoil
1 length of Chain (fit to the size you want/need)
Unwanted Polymer Clay
Oven
Embroidery Needle or Pencil
Jump Ring(s)
Polymer Clay, Any Two Colours.
First, take the polymer clay you don't want/need, constitute it, and roll it across your work surface and your hands, cleaning them off. This ensures that when you form the tentacle(s) they don't get stuff on them from dust or animal fur or anything.


Next, take your second colour of polymer clay and roll out a long, thin strand. Cut the strand into small sections, about 2mm long.


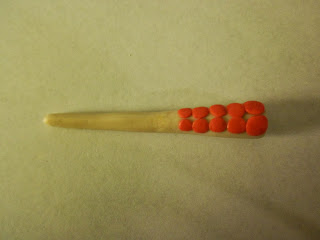
Start placing the dots on the cone.
I like two rows on my tentacle, but you can obviously do more or less depending on how shaky your hands are, or how pleasing it is to your eye. All up to you!
As you go down the cone, the dots can get bigger than you want them to. Just carefully take the dot off, shave a bit of the clay off, re-roll into a ball, and flatten. That might do the trick. If it doesn't, repeat.

Next, take each section and roll into spheres. Slightly flatten spheres until they're about the width of a penny, maybe a bit less.

Start placing dots onto the cone until it is filled all the way.

I like two rows on my tentacle, but you can obviously do more or less depending on how shaky your hands are, or how pleasing it is to your eye. All up to you!
As you go down the cone, the dots can get bigger than you want them to. Just carefully take the dot off, shave a bit of the clay off, re-roll into a ball, and flatten. That might do the trick. If it doesn't, repeat.
Fill the cone all the way to the end.
Poke holes into each dot with pencil or embroidery needle.


No comments:
Post a Comment